This article is for spinners who are dealing with a wool moth infestation in their stash! (Applies to a yarn stash, too!)
Those of us who keep a large stash of wool fleece or other protein fibers for our handspinning hobby or livelihood have some special considerations to protect our investment.
If you are reading this, you have probably either seen tiny moths in your house or you have already found some damage. First, let me say that I am so, so sorry because I have also had this happen to me. Such tiny creatures can cause such devastation, both financially and emotionally.Let’s stop this NOW before the situation gets any worse! We’re going to follow a 10-step Solution:
Step 1: Quarantine the Contaminated Fiber
Step 2: Pull Out Your Entire Stash
Step 3: Identify Contaminated Wool
Step 4: Separate the Suspicious Stuff
Step 5: Clean, Contain and Protect the Good Fiber
Step 6: Safely Store the Clean and Isolated Fiber
Step 7: Deal With the Suspicious Fiber
Step 8: Face the Contaminated Fiber
Step 10: Prevent Another Infestation
Step 1: Quarantine the Contaminated Fiber
If you’re lucky, you caught this at the beginning and the evidence you found is the only infestation you’ve got. Isolating known contaminated fleece (or yarn) is the first step. Get it into a plastic bag, seal it up and place it outside and away from your other wool. We’ll come back to it later in Step 8 to decide if it’s worth rescuing or not.
Step 2: Pull Out Your Entire Stash
You’re going to have to pull out ALL of your fiber. Focus on wool, llama, alpaca, cashmere, mohair, angora, camel, quiviut, muskox, possum, or any other novelty fiber you may have in your stash. Pull out the silk and cotton and flax and bamboo as well. (The larvae do not eat these fibers, but they may still have laid eggs there.) I know this sounds hard, depending on the size of your stash! I sympathize. I had a whole flock of sheep and a barn full of wool, as well as what I had inside my house after raising Angora rabbits for 18 years.
Step 3: Identify Contaminated Wool
You’re looking for these signs of contamination:
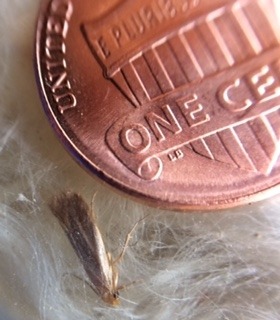
Moths — Dead or alive. About 1/8″ long (3-4 mm), they are generally golden in color. (Some are a little larger or darker. I have actually had the larvae of Indian Meal Moths, with their dark banded wings, infest and eat wool as well, even though they are considered a pantry pest.) In this form, the moths are laying eggs that will result in damage-causing larvae. The moths themselves live short lives and do no direct damage.
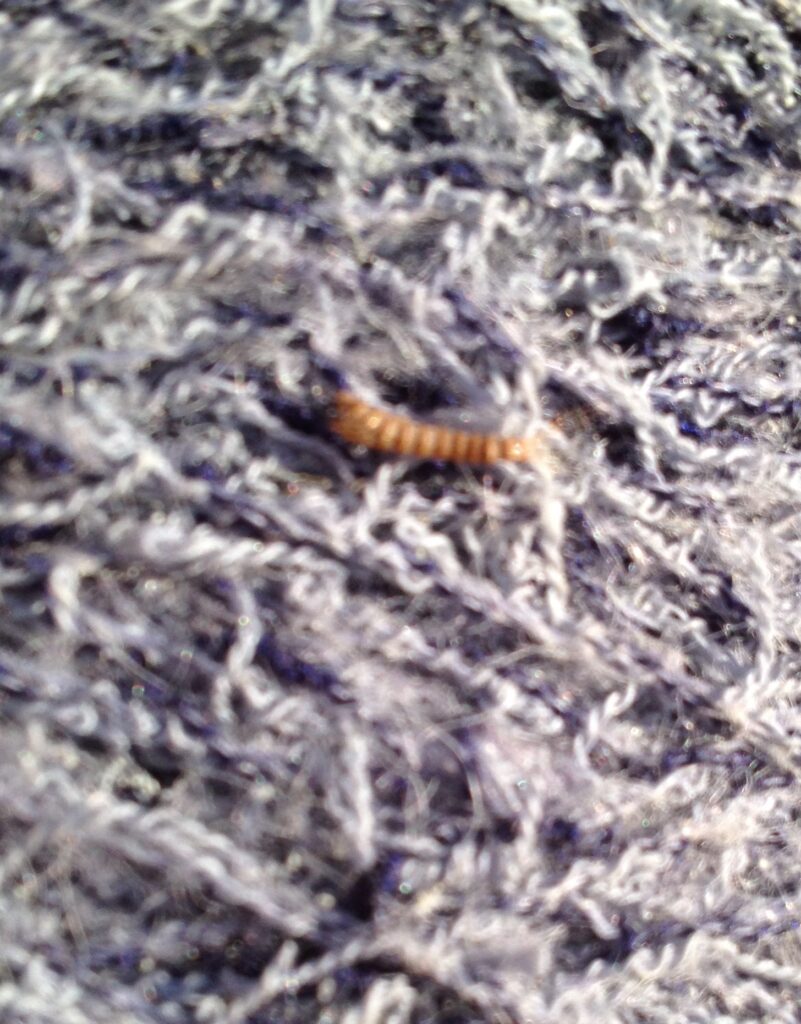
Larvae — Brown, segmented “worms,” they may be in a pocket of dusty, eaten wool or crawling along the bottom of your container or basket. They are the source of the damage that can result from infestation.
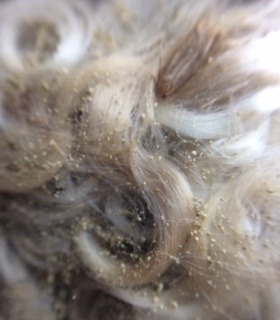
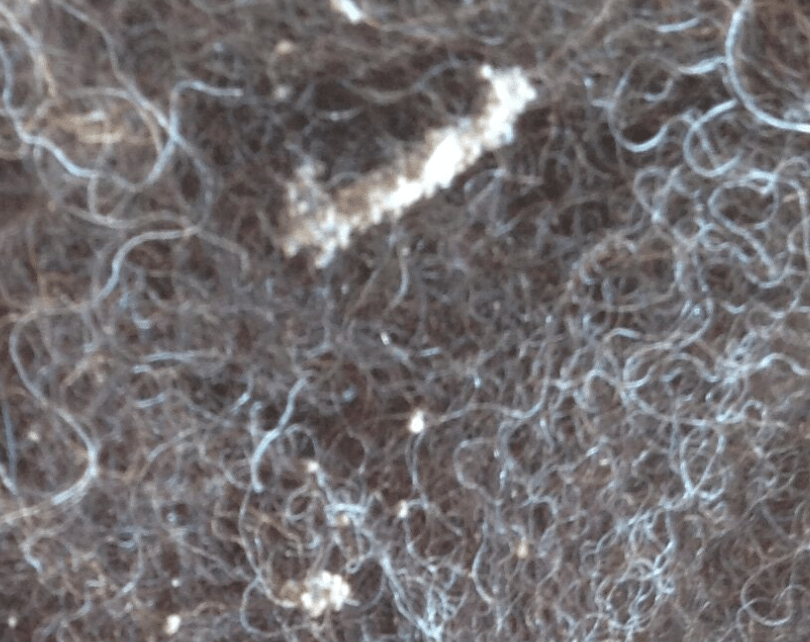
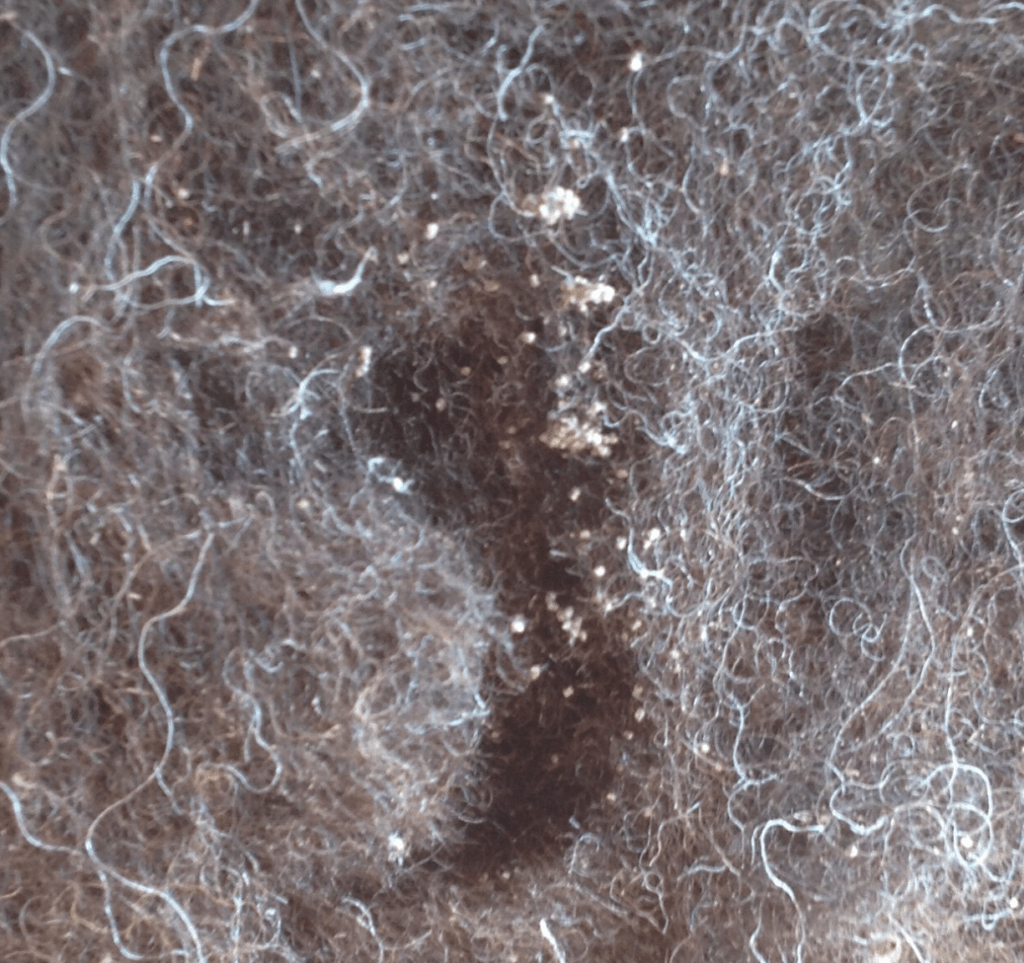
Oddly dusty or grainy wool— Fibers may be reduced to powder in small pockets or trenches through the wool.
Sandy looking areas — Moth eggs are round and tiny, like sand. They are generally gray in color but can range from white to beige to brown as well. They lay eggs directly onto wool, but also in the darkest corners of chests or bins or baskets where you store your wool.
Webbing, like messy, tiny cobwebs, or casings like little cocoons.
Holes, trenches, or cut-looking fibers are signs that moth larvae have been at work.
Tiny black beetles — These are not related to wool moths, but are another type of protein fiber consumer. You may have carpet beetles, rather than wool moths if you’ve found damage but haven’t seen moths flying.
Step 4: Separate the Suspicious Stuff
If you saw ANY of the signs listed above, pull that fiber out and away from your other stash. It needs to be quarantined and watched carefully. Set it aside for now, while you protect the fiber you believe is still uncontaminated.
Step 5: Clean, Contain and Protect the Good Fiber
Any fiber that you believe is still safe needs to be stored in a way that keeps it that way as much as possible. It needs to have multiple layers of protection. This is to prevent any moth larvae from entering, but also to isolate any larvae from the rest of your stash if you missed some in your sorting! Keep small amounts of fiber in doubled small plastic bags. Whole fleeces should each have their own double bag and plastic bin, just like the smaller packets of fiber.
- Be sure to check each bag, box, or bin for dust in the corners. Don’t assume it’s vegetable matter. If there’s dust, toss it over in the pile of suspicious fiber!
- Check to see that each bag is intact, with no holes or scratches or weak spots.
- Wash the surface of each bag to make certain there are no moth eggs on the outside.
- After they dry off, double-bag each package of your precious spinning fiber with a second, heavy-weight plastic zip-lock bag.
- Fleeces may need larger heavyweight bags.
- This might be a good time to toss in a silica gel packet, especially if you live in a humid climate. They’ll protect your fiber from mildew and help discourage bugs.
- Add an herbal moth-repellant while you’re at it. They don’t kill the bugs, but they disguise the sulfur scent the moths are searching for to indicate a possible food source.)
Step 6: Safely Store the Clean and Isolated Fiber
- Collect the double-bagged packets of wool into a clean bin. Clear plastic bins are best because wool moths prefer the dark.
- Before adding your bags of wool to these bins, add a dusting of diatomaceous earth to the bottom of the bin. This is a non-toxic, odor-free powder which will ensure that any larvae which hatch later cannot contaminate your wool by chewing their way into your baggies. (To read more about D.E. safety and uses, check out this thorough article by Pest Strategies: https://www.peststrategies.com/pest-guides/diatomaceous-earth/.)
- Store your bins of clean, isolated fiber in a place where you can check on it frequently, preferably in the light.
- If you missed some eggs and one of your baggies of “safe” wool has some larvae hatch after all, they won’t be able to get out into your stash.
- Be forewarned, though, wool moth larvae CAN chew through plastic! You’ll still need to check on your stash every couple of months to ensure that small infestations stay isolated and are removed from their bin before they can spread.
- It has come to my attention that there is a video out stating that this claim is incorrect, but I assure you I have had FAR too much personal experience!
- When the larvae are hatched and seeking protein fiber to consume for survival, they will chew through just about anything. It’s small comfort that they will die in the process when you have holes in your cotton fabrics that were stored with infested wool, or plastic bags with holes and powdered, destroyed Angora fiber inside.
Step 7: Deal With the Suspicious Fiber
You have a pile of fiber that you think could possibly be contaminated. Here’s what I recommend:
- If some of this is old, matted, ugly, or otherwise low-quality fiber, consider eliminating it from your stash. When I first learned to spin, I kept everything! Yes, I really could find cool ways to use the belly-wool skirted from my friend’s flock, or that fleece that was in the washer when I accidentally let it start to agitate. But will I? It may not be worth keeping if it could also be buggy.
- If it is expensive or otherwise precious, set it aside for Step 8.
- Follow the very same procedure you did in Step 5, making certain that each bag of fiber is clean and separated by multiple layers of plastic.
- Collect the suspicious stuff in plastic bins, just as you did with the clean fibers.
- Don’t put it with the clean stuff! Keep it out, convenient, and away from your spinning area.
- You need to check these bins at least once a week for a couple of months, before putting them near your good stash. Look for the same signs you did in Step 3. If a single baggie of fiber shows new signs of contamination, pull it out of there!
- Eventually, your suspicious bin can join the good stash if you go for months without signs of infestation. Be sure to follow the cleaned, contained and protected steps you did with your good stash!
Step 8: Face the Contaminated Fiber
Be strong.
This is hard.
You may have to through away some fiber.
- If your fiber has been turned to dust, say goodbye. Realistically, there is no way to save heavily infested wool.
- If the fiber was not valuable either sentimentally or financially, say goodbye. Focus on what’s precious to you.
- If it was precious, carefully pick out any parts of it that were not heavily contaminated or have living critters in it and say goodbye to the rest.
Step 9: Save What Is Precious
With the part you really want to save, you should first wash your fiber.
- Using as much water as possible with a gentle wool-wash such as Kookaburra, wash in small batches.
- You never want to agitate protein fibers when washing, so they need as much room as possible for the eggs to fall away and for cut fiber to wash away into the water.
- Drain the water, careful not to agitate. Set the wool aside while you refill your washing container with hot, soapy water. Replace the wool into the water without pressing or squeezing to avoid felting.
- Repeat this washing cycle until you no longer see short fibers floating on top or dirt sinking to the bottom.
- Rinse all soap from the fiber by repeating this cycle without wool-wash.
- Spread your fiber out on a drying rack in the sun.
- (You can use nylon netting over any inexpensive drying rack to hold your fiber while it dries.)
- The sun is the enemy of all kinds of infestations, and wool moths cannot tolerate it.
- If your fiber is dyed, limit the time in direct sunlight to prevent fading.
- When it is still damp but not dripping, put your fiber into a heavy plastic container which can fit into your microwave oven. Cover it lightly (not airtight.)
- Microwave your damp wool, preferably at 50% power, for 15-second intervals.
- Check every 15 seconds for any signs of burning. (Microwaving does not burn the damp wool after such a short time, but if there is still any dirt or sand there the minerals can react with your microwave.)
- When your wool feels mostly dry to the touch, stop microwaving.
- Return your wool to the sun to finish drying. It probably still has moisture in it.
- When it is dry, follow the same steps you did for the suspicious fiber. Add several silica packets to the bag to make certain it is dry. Keep it clean and contained and away from your good stash. Store it in the light, and check it frequently.
Step 10: Prevent Another Infestation
You’ve gotten your infestation under control. But… in the words of Dr. Ian Malcolm from Crichton’s Jurassic Park,
‘”…the kind of control you’re attempting simply is… it’s not possible. If there is one thing the history of evolution has taught us it’s that life will not be contained. Life breaks free, it expands to new territories and crashes through barriers, painfully, maybe even dangerously, but, uh… well, there it is.'”
For the best results, continue to be vigilant against infestation.
- Check on your bins of fiber frequently.
- Remove any suspicious fibers and treat them with the washing/sun/microwave process from Step 9.
- Isolate any new fibers you add to the stash by cleaning the bag and then double-bagging that.
- Spray herbal moth deterrent on any wool you have out, such as the bobbin on your wheel, to discourage them from landing on your WIP.
- Purchase moth traps and check them frequently. If you find moths in them, start from Step 1 again!
Comments are always welcome here at SlowYarn! Tell us what you think, share your ideas, or comment on the content. Or you can contact me directly at Kelley@SlowYarn.com.
Thanks!
–Kelley
Copyright © 2015 – 2024 Kelley Adams. All rights reserved.
All text, photos, and graphics are the property of Kelley Adams unless credit is given to an alternative source.