Blue Tapestry Woven Mandala Wall Hanging
Have you wondered how to make a woven mandala? Circle weaving is easier than you might think! I’ll take you through the steps I took to create this Blue Tapestry Mandala. It is a simple project, suitable for beginner weavers. It’s easy to make variations by using different textures or colors of yarn, or by varying the pattern of the weaving. There are lots of other ways to weave on a circle loom, but with this project, we will make simple, spiral weaving around and around, to create a symmetrical mandala effect.
Let’s follow the process, step by step.
This weaving was done on a circular hoop loom, eleven and a half inches across, with notches cut around the outside of the hoop. This loom is meant to be the “frame” of the finished piece, and you won’t be cutting your weaving off of the loom. A circle weaving can be done around any hoop, but these with the notches cut in them are by far the simplest to use. If you use an un-notched hoop, like a wire wreath base, it is best to wrap it with yarn, or with slightly sticky floral tape. This wrap will hold your warp strings in place, although you have to eyeball the spacing or measure and mark your spaces.
Warping Your Hoop
The first step in any weaving is to select and create your “warp.” This term refers to the taut strands of string or yarn that stay in place, while other threads, called the “weft,” are woven in and out of them. My favorite warp for these mandalas is a mercerized crochet cotton thread, which has strength and sheen. I’ve used a variety of yarns, or even packing string from the office supply store.
For a circular weaving, we tie the thread around the outside of the hoop to secure it. Then, we wrap it around the outside of the circle loom to create the warp. The first wrap should go straight across the circle, around the outside of the hoop, and back to a slot immediately clockwise to your anchored thread. Continue wrapping across the hoop, placing each thread one space clockwise from the previous wrap. These threads should be straight, but not pulled tight like guitar strings. They will get much tighter after you begin weaving.
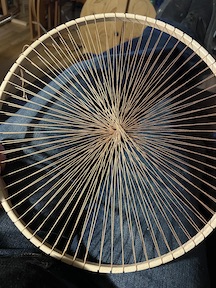
Don’t panic if you are off by a thread. There is no need for perfectionism, as this kind of weaving should be relaxing and easy. If you need to wrap an extra time, it’s okay. Just make sure you have at least a single warp thread on each notch in your hoop. Your warp will be double sided. Each “spoke” of the wheel has a thread on either side of the hoop. It is possible to weave a two-layered piece, but it’s far easier to use each pair of threads as a single warp, holding them together in the middle.
Beginning to Weave
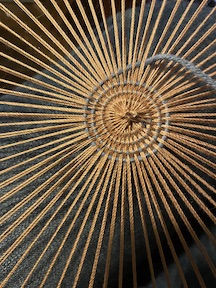
Here, the first weft thread has been started, weaving a simple “tabby,” or every other thread. This simple “over one, under one, repeat” pattern is the basis of all weaving. In a circle weaving like this one, you can see how the weft has drawn together each pair of warp threads. It has also cinched up the center, where all the warp threads cross.
This weft is a contrasting color and texture, but you can also get a really nice effect by using more of the warp thread for the center of your weaving. Texture and pattern are featured by choosing not to use a contrasting color.
Note that the space between warp threads gets wider at the outside of the hoop, and the threads are very tight where you begin to weave. The center looks nicest with a thread or small yarn, and the outside, with it’s wider spaces, looks better with larger, bulky yarns or roving.
Continue Tabby Spiral
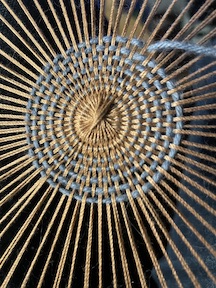
This photo really shows how that center of crossed tan warp thread has been cinched together by the blue weft yarn. It looks identical on the back side of the weaving. If you’re careful about how you tuck your ends, this type of weaving can be equally attractive on front and back, so it can be hung like a mobile and allowed to spin.
Introducing Other Colors and Textures
The light blue weft thread changed and became more dominant over the tan when the weaving pattern changed. Instead of “over one, under one, repeat,” the pattern shifted to “over two, under one, repeat.” Also, an extra strand of the light blue yarn was added. Weaving is a little slower with multiple strands, because it looks much neater if the strands aren’t allowed to twist. Straightening them takes patience, but using multiple strands looks interesting and makes the weaving cover more of the warps.
The darker blue is done with an “over three, under one, repeat” pattern. The appearance of a spiral is due to the shifting that happens naturally with each pass around the circle with the weaving.
Adding Different Textures
The natural jute circle that’s been added is woven in an “over three, under two, repeat” pattern. Because the jute is a stiffer yarn, it creates more stitch definition in the spiral pattern than the softer blue yarns.
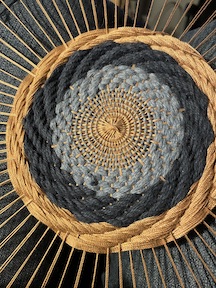
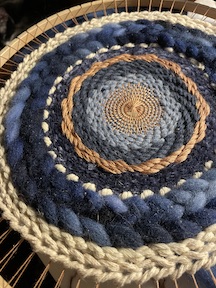
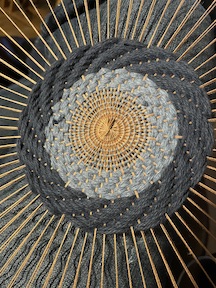
Finishing the Tapestry
Several more rows have been added outside the jute spiral, to complete the tapestry. The blue roving and the white macrame cotton were both added using the Soumak stitch. This pattern gives the impression of braiding, or knitting, and adds depth and texture to any weaving. It’s my favorite way to add roving to a piece.
With this weaving, I chose not to weave all the way to the very edge of the hoop. I liked the way the tan warp strings repeated the core and the circle of tan color in the center. You can stop weaving at any point, if you feel that it is “done.” Or pack your weft threads all the way to the edge!
Once you have finished weaving your mandala tapestry, there isn’t much left to do. It can be hung with a simple nail just under the hoop; or you can use the tail of the first warp that you anchored around the outside edge as a hanging hoop. If you have been careful about tucking in your cut ends, the tapestry should be reversible. Another option is to add fringe, hanging from the sides or the bottom of your circle.
This project can be an ideal way to experiment with textures and types of yarns, or with color combinations. It can be used as a meditation, as well. Because it is repetitive and doesn’t require lots of decisions or any noisy equipment, it is an ideal way to practice mindfullness while still feeling productive.
Copyright © 2024 Kelley Adams. All rights reserved.
All text, photos, and graphics are the property of Kelley Adams.
Comments are always welcome here at SlowYarn! Tell us what you think, share your ideas, or comment on the content. Or you can contact me directly at Kelley@SlowYarn.com.
Thanks!
–Kelley