
How To Eco Print

Would you like to learn how to eco print? Read on!
Nature printing, or eco printing, is the art of pressing leaves onto a fabric or paper surface and extracting the natural dyes from the leaf, leaving a perfect print of each leaf’s surface. Some leaves print more clearly than others, but every single time there are surprises when you unwrap your “bundle.”
If you haven’t tried nature printing, or “eco-printing,” yet, get out there and try it! I’ll describe the most basic, simple process here, and give you some more refined techniques in another article– for more predictable and pretty results. For the first experiments, basic is all you need!
Eco-printing is different from any other art form:
- You can preserve the beautiful shapes of nature.
- You can free your stifled creativity: Remember pressing pretty leaves between sheets of wax paper as a kid?
- You can feel like it’s your birthday every single time you open up a bundle and see what gifts Mother Nature left for you inside.
- You can find materials FREE! They are literally lying in the ground, waiting for you!
- You can make beautiful gifts for your friends and family.
- You can WEAR your creations!
Let’s get started learning how to eco print!
Materials — click on the links to get details about the materials.
Instructions for Fabric
- Get your fabric damp and spread it out on a table or other flat surface.
- Lay your leaves out on the fabric.
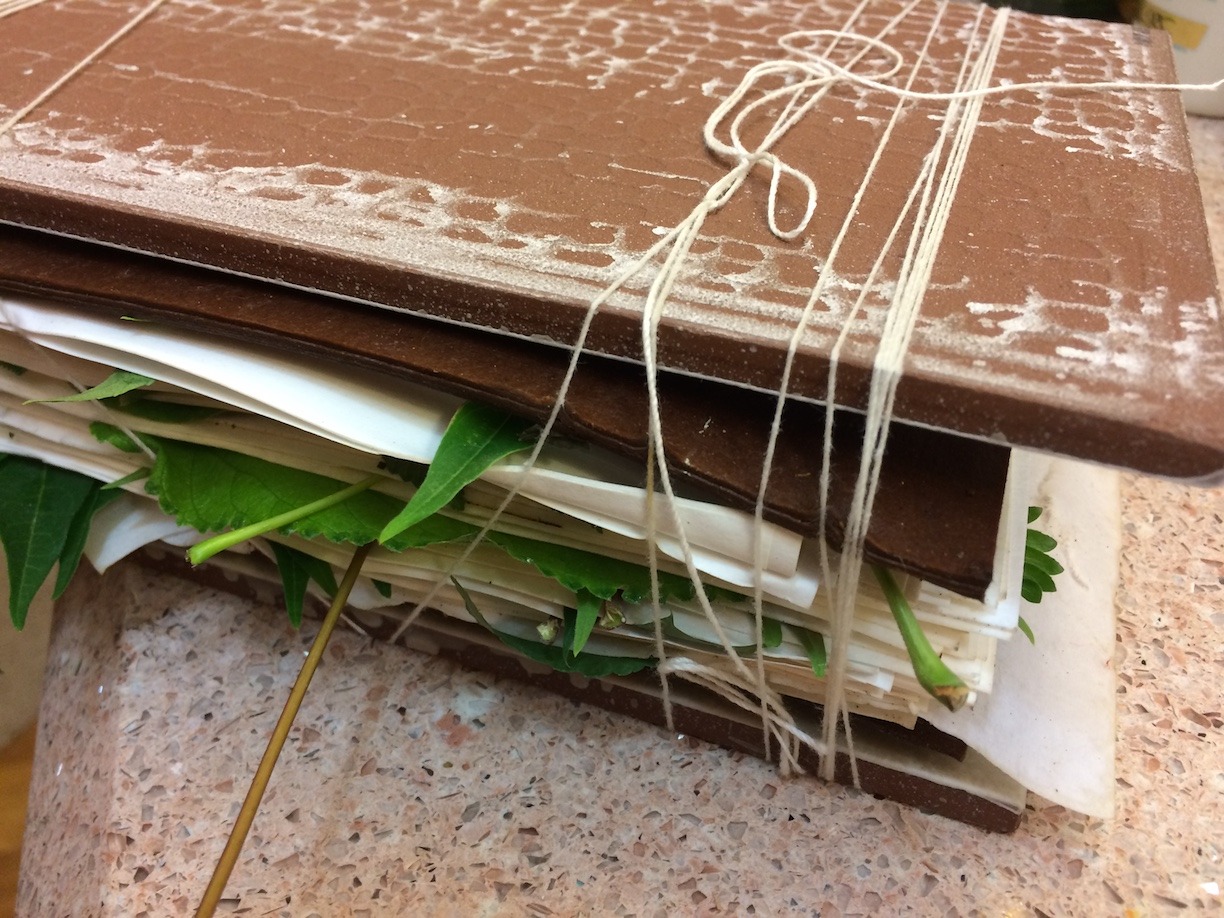
- Fold the fabric with the leaves inside, until it can wrap around your stick.
- Roll the folded fabric around the stick, as tight as you can get it.
- Wrap string around the bundle to hold it onto the stick.
- Put it into your pan with the cup of vinegar and enough water to cover.
- Bring to almost a boil, then turn it down to a simmer.
- Simmer for 1-4 hours. Mmmm! Weed stew!
- Let it cool.
- Cut away the string and unwrap your bundle!
- Handwash the fabric gently and let it dry. (You can speed up the drying process by ironing it. That gets out the wrinkles and dries it at the same time.)
- Show it off to everyone!
Instructions for Paper
- Cut or tear your paper into a size that will fit flat into your pan.
- Dampen your sheets of paper in water with a splash of vinegar in it.
- Begin stacking a “leaf sandwich.” A piece of paper, some leaves, another piece of paper, and more leaves.
- Quit stacking when you run out of paper or your bundle is about 4 inches thick.
- Wrap string around this loosely. You don’t want to cut the sides of the paper– just hold the stack together.
- If you have a couple of old floor tiles that will fit in your pan, you can tie those to the outsides of the bundle of paper to help keep it flat.
- Put a few small rocks in the bottom of the pan to suspend the paper an inch or two.
- Put the bundle in the pan.
- Put a flat rock (or tile) on top.
- Fill with an inch or two of water.
- Put on the lid and steam your bundle for an hour.
- After it cools, unwrap your bundle and be amazed at the leaf prints!
- Carefully rinse each sheet of paper. It tears easily, so be gentle!
- Spread them out to dry.
- If they curl up, you can iron them with a clothes iron or put them in a big book and press them like… well, like a leaf!
The Fabric
The only tricky part here is that they must be fabrics made from natural materials. It’s pretty easy to find 100% cotton since most t-shirts are made from cotton. A lot of bed sheets are, as well. Watch for polyester, though. It won’t take the dyes, which makes your project disappointing. Try the thrift stores for some great finds! Look for white or pale colored fabric in Linen, Cotton, Silk, or blends of those. Try old sheets, t-shirts, dresses or skirts; all of these are commonly made from natural materials like cotton. Lycra is in a few of these; as long as it’s under 5% the fabric will probably dye just fine.
You can also purchase silk. Silk fabric is surprisingly inexpensive and has stunning results, every single time. I recommend Dharma Trading Co., especially if you’re in the US. They are great to work with and have lots of choices. I love their 8mm Habotai silk scarves and I’ll buy a bunch of them in different sizes. Everybody you know is going to love yours and want to try this nature printing thing, too, so get some to share.
![]()
The Paper
Plain old copy paper works fine. Just keep in mind that it is really fragile while wet, and you’re going to be steaming it. Most eco-printers recommend using heavy-weight cold-press watercolor paper, but in my side-by-side trials, I thought the cheaper paper printed more clearly.
![]()
The Stick
Yeah… really… just a stick. Straight without poky-outies on it would be best, and at least as thick as your thumb. If you happen to have some copper pipe, it works great, too. Make sure the stick fits in the pan and the lid can still go on.
![]()
The String
Recycled or re-used string is just fine. Rubber bands work, too. Some people even re-use old plastic water bottles before they recycle them. If you cut both ends off, it makes a nice “sleeve” to slip your bundle into, and it will shrink when you boil it to make a nice, snug fit. I don’t use them myself, just because it seems wrong to throw plastic in boiling water and call it eco-anything.
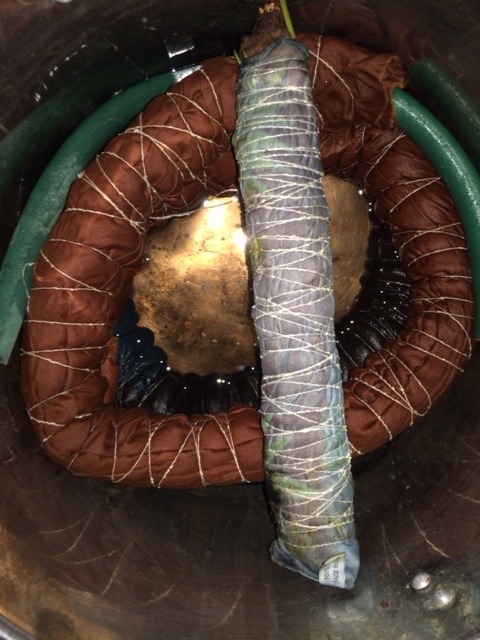

The Pan
Find an old pan. Unless you know for certain that none of your leaves could be toxic I’d get a pan designated for dyeing only. Even if the leaves are all fine, now you have a pan for dyeing and can try some other cool projects, too! The best pans for dyeing are stainless steel or ceramic coated. All other metals will affect the colors of the dye from your leaves.
![]()
The Vinegar
Any vinegar. You can use the apple cider vinegar somebody convinced you to buy because it cures what ails ya’, or pickling white vinegar– name-brand or generic — or even that wine vinegar you bought for that one recipe that wasn’t good enough to cook twice. The acid in it helps break down the waxy coating on the leaves so they print more clearly. I admit I don’t measure; I pour “some” in. Let’s say a cup, I guess.
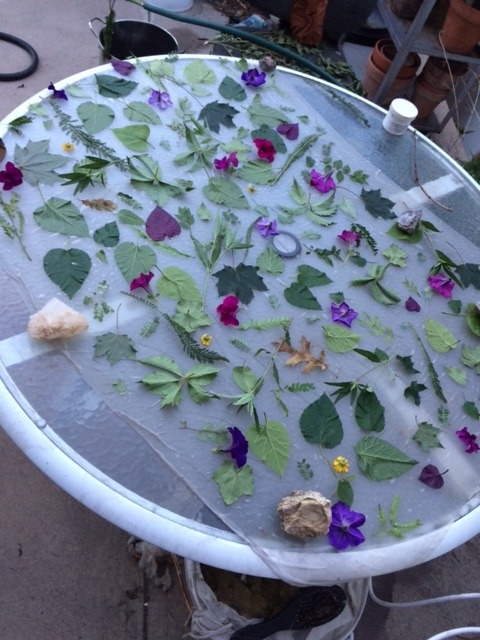
The Leaves
Leaves! Any leaves! The more, the merrier. Later, you can work on perfect, intentional composition with leaves that you have tested and you know they can print. For now, it’s all a mystery! Will this leaf print? A maple leaf? A cottonwood? Oak? With the exception of eucalyptus leaves which always print but which don’t grow where I live, the answer always seems to be, “Sometimes!”
Sometimes one type of leaf prints well, but the next time you try it there is nothing there. It depends on how you treat the fabric, whether you steam or boil, how tightly you roll your bundle, the time of year, whether it was a wet year or a dry year for the tree, whether it has tannic acid in the leaves or not…It really is a mystery. I’ve used the same types of leaves on the same fabric and boiled them at the same time but each bundle printed differently. So, for your first time, try everything, don’t worry, and have fun!
![]()
A Camera
Since this is an experiment, and you don’t know which leaves print in your neck of the woods, be sure to take LOTS of pictures! Document the leaves and how they were laid out. It is astonishing how much a lilac leaf looks like a forsythia leaf after they’ve been squished and boiled for an hour. If you have one stunning leaf print in the middle of your fabric you will really want to know what kind of leaf made it, so take lots of pictures to help you identify it!
![]()
I hope you got some treasures from this fun project! Comment below about your experiences with this project, or contact me directly at Kelley@slowyarn.com. If you’re an eco-printer and I missed something or you have ideas for the next, more detailed instructions, please comment below! Thanks!
Copyright © 2018- 2023 Kelley Adams. All rights reserved.
All text, photos, and graphics are the property of Kelley Adams unless credit is given to an alternative source.


Hi Kelley-
Great article, thank you!!
Is the vinegar acting as the “mordant” in this experiment, or is something else required?
Thanks!
I didn’t include any mordant in these instructions since I wanted them to be very basic for a first try. There are so many ways to improve your results, that’s at least another article– if not several! Vinegar helps to break down the waxy coating on the leaves and seems to improve the print on protein fibers like wool and silk. Protein always prefers an acidic environment for dyeing. If you want a quick, easy mordant, add some rusty metal to the pan as you simmer. A few old nails work to add iron as a mordant to the dye bath, which will darken most prints.
That’s very helpful, thank you!!
I’m glad it’s helpful, Kelly! Remember, you can collect fallen leaves right now for printing later. Press them, or just keep them in a safe corner to prevent crumbling. I’ll be teaching some online classes on ecoprinting– coming soon! (I’ll send email to all subscribers when I get the class up and running.)
Sweet! Thank you!
Thank you Kelley for your simple but very helpful instructions. Do you think steaming is as effective as boiling?
Be careful to keep the temperature low, at a simmer rather than a boil. The color will be stronger and it is safer for your fabric. Steaming is better for more delicate plant materials, such as flower petals. It also preserves the background color better than submerging; the natural color of your silk or whatever color you are using for a dye blanket. When the whole bundle is down underwater, all the color from the leaves circulates through the water, creating a dyebath of mixed natural colors. You are more likely to get a khaki colored background, where the tannins of the leaves tint everything in the bath.
Can you get the same results from using a slow cooker? Thanks
Yes! If you’re trying to steam, you’d need a rack in the cooker to keep the bundles from sinking. I generally submerge my bundles, because I like the dye from the dyebath that seeps in.
–Kelley